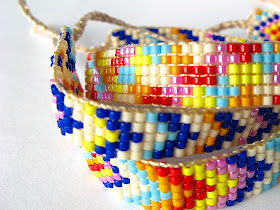
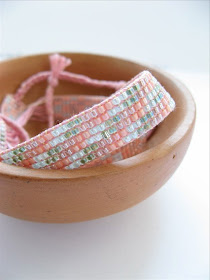
There's nothing like a little new arm candy to brighten up your day....

|

|
 |

|
If you're keen to give this a try yourself, the following guide will get you started.
Materials:
Crochet thread
Bead thread (or cotton, but it won't be as strong)
Seed beads
Beading needle (that will fit through tiny beads)
Embroidery hoop (25cm works well) or bead loom if you have one.
NB. It's important to choose seed beads of high quality that are very even in size, which will keep your bracelet width even as well.
 To get started you need to think about your design and decide the width you want your bracelet (ie, number of beads across - I went for 6 in the pink options and 8 in the zigzag designs). I mocked up some basic ideas on paper - graph paper would be great for this.
Diamond shapes and diagonal stripes are a good starting point, or try something a little more free form.
Today I'm going to used these assorted sorbet coloured faceted beads in a graded rainbow pattern.

Once you know the width, you know how many lengths of the crochet thread you'll need. Today, I am going to make my bracelet 6 beads wide, so in this case, I need 7, as these run on the outside and between the beads.
Count out the lengths, ensuring that they're long enough to sit across the diameter of your embroidery hoop.
Tie one end and lay the threads across your hoop so that none of the threads cross over. You will need to ensure the threads stay taut throughout the beading process, so adjust them as you need to.
I like to put my beads in a small bowl, so that they're easier to thread onto the needle.
Then you're ready to get started.
Leave enough space to plait and tie off the ends afterwards (I leave about 6cm) and then tie on your bead thread, which needs to be about 2 arm lengths.
Thread your needle and then thread on your first row of beads, running left to right.
then thread your needle back through the beads, on the upper side of the crochet threads.
When you pull the thread back through give it a little tug to ensure the thread is taut. You want to keep the rows at an even tension.
You've just completed your first row!
And repeat, ensuring you follow your chosen pattern... every few rows, push the beads up slightly to make sure that your beading is compact and again, remember to keep the tension even.Keep going until your beading is about 15cm long...
Then you need to remove the ends from the embroidery loop, leaving it held in place at the top end (where you started). Plait these loose ends for about 5 - 6cm, depending on how wide your wrist is, and tie off. Then remove the other end from the hoop, plait these ends in the same manner and tie off.
Your done!
I hope you enjoyed this little project and that you've created something you love to wear. Let me know what you've created and I will post the results to share with everyone. A little inspiration goes a long way!


i can not end these bracelet. How should i do?
ReplyDeleteHi Gozde,
DeleteI plait the ends and then tie them off. Sometimes I add a large bead just before the knot for a nicer finish.
I hope it works out :)
where do you get your beads from?!
ReplyDeleteHi there,
DeleteI use Japanese "delica" beads. If you're in Australasia you can buy them at Spotlight, but I think you'll also find them on-line no problem. They have AMAZING colours and are very even in size, perfect for this project.
thanks so much! great tutorial!
ReplyDeletei have one more question for you, please! what size are the beads you're using?
ReplyDeleteHi there, I use size 11/0.
DeleteWhat a great tutorial! I'll be showing my daughters this over the weekend.
ReplyDeleteVery good tutorial - lots of attention to detail will make it easy for anyone to make their own Friendship Bracelet following your guide.
ReplyDeleteThank you!
Deletefabulous tut! every detail is clearly displayed; I wish to reproduce and post it on another site, could I? thanks:)
ReplyDeleteHi There, thanks for getting in touch and glad you like the tutorial :)
ReplyDeleteI am happy for you link to my page, but I would prefer you do not reproduce it on another site.
Thanks,
where are you supposed to tie your bead thread onto??
ReplyDeleteHi Danielle,
DeleteTie your bead thread onto the first string, when you start your first row. I just use a basic double knot, but leave enough of a loose end, that you can plat this in with your vertical threads, when you're finishing off the ends - it hides the end really well and you'll know it's nice and secure. The bead thread is so fine that you can't really see it in the image above, showing the first row of beads.
Happy making!
This comment has been removed by the author.
ReplyDeleteOMG Sarita what a pretty bracelets. This is my first time to this site but my friend has told me about your work and you are very very good!
ReplyDeleteBead bracelets
Thanks Adina!
DeleteI love this idea! I'm new to jewelry making and am not sure about the crochet thread. What size should I get for this project?
ReplyDeleteHi Meredith,
ReplyDeleteI used #8, DMC cotton perle. You don't need much, so it's fine to buy a 10g ball and there are lots of pretty colours. If you're not sure where to start with colour my failsafe choice is ecru, it let's your bead colours stand out.
Enjoy your project :)
Would definitely try this one. This can be also be a great giveaway and can be a gift too this Christmas.
ReplyDeleteThese are so pretty! I've just added them to my roundup at http://www.babybugjournals.com/roundups
ReplyDelete